I overthink things. This is fact.
And when it comes to writing in my blog, I absolutely overthink every word. I'm a copy editor, so I go back and catch errors and fix them. I reread. I write posts that I don't actually publish all.the.time. And I get upset when I realize I made a typo or a misspelling or I left an awkward sentence alone (and I go back and fix these things days later*).
I'm doing it
totally wrong.
I have seen multiple bloggers lately - recipe bloggers and not - post about how they make their super special iced coffee. Well, look, I thought that was simple enough to not need a recipe but apparently it needs one. I'm jumping on the train and I'm following the crowd and I'm leaping off the cliff and I'm mixing up all the metaphors into one messy sentance with a typo in it that I am going to leave there and not fix. For now. Probably. (SENTENCE)
Here is how I make the iced coffee that I drink almost daily in the summer:
STEP ONE: COLD BREW
Yes, yes, I can absolutely use leftover coffee from the morning, if there is any, and just pour that over ice and call it a day. I can also freeze that leftover coffee if I'm feeling extra fancy and use that frozen coffee in with hot-brewed-cooled-down coffee. But I prefer to start with a cold brew - and that takes a bit of pre-planning. (When I forget, I do the leftover coffee/hot over ice blahblah. It doesn't taste
as good to me, but
some people think ristretto tastes better. This is my blog, this is what I like.)
I take one cup of ground coffee to start. The grind? I tend to go with a coarser grind, as that seems to work better. Lately I've just been grinding it in my grind-your-coffee-maker - I don't add water to the machine, I run the beans through the grinder bit until they fall into the basket, and then I turn it off and voila. I have to do this in two batches of a half cup of beans at a time, but it works. The roast/type of coffee? Eh. I have used cheap crap from the grocery store and it's just fine for this purpose.
 |
| Trader Joe's Half Caff |
I recently discovered, though, that
Trader Joe's half caff is actually
amazing for cold brew - it just has the right blend of flavor and roast and bitterness (or lack thereof) and smoothness...everything. Plus, I often have my iced coffee in the afternoon when I'm not looking for quite the same kick as I get from my preferred hot coffee, which is organic Colombian from the farmers market (the indoor store, not the outdoor market). That also works for this "recipe" by the way. But just...use whatever.
 |
| Reason #12908 why I'm not a food blogger: My camera. No fancy DSLR for this lady! This is a good old cellphone pic. Anyway, this is what a cup of coffee grinds in an Ikea container looks like, if you were curious. |
So I take this cup of grinds and I dump it in a container. Usually one of the cheap plastic containers I got from Ikea. Sometimes an old container I used to use with my vacuum sealer. Doesn't matter. Maybe someday I'll go for a
Toddy - I've heard those are great. This works for now.
 |
| With 4 cups of water.... |
Then I dump four cups of water on top and I put a lid on the thing and I sometimes swirl it or stir it if I think of it, and I shove it in my fridge.
I wait...well, usually I wait about 12 hours. Sometimes a bit more, usually not much less.
Next I take the mesh strainer I bought one time because I wanted to make giant pots of sweet tea or something (spoiler alert: I did that maybe once) and I pour the coffee through it and let that sit as long as I have patience for it. Sometimes I press on the grounds in the mesh a bit with a spoon.
 |
| On the left, the empty container. On the right, the grounds being strained into a second Ikea container. I used a silicone spatula-thing to squeeze as much coffee out of those grounds as I could. |
Then I dump the grinds in the trash (I don't compost but of course you totally could) and I rinse the strainer and I put a filter in it (the cone-shaped ones) and I pour the coffee through that one more time. This takes a bit of time so I pour, walk away, come back in about 15 minutes and check. Sometimes I swap out the filter if it looks a bit thick in there, but in the end what's important is just straining it all through the paper filter.
 |
| Paper filter, metal strainer, plastic container. |
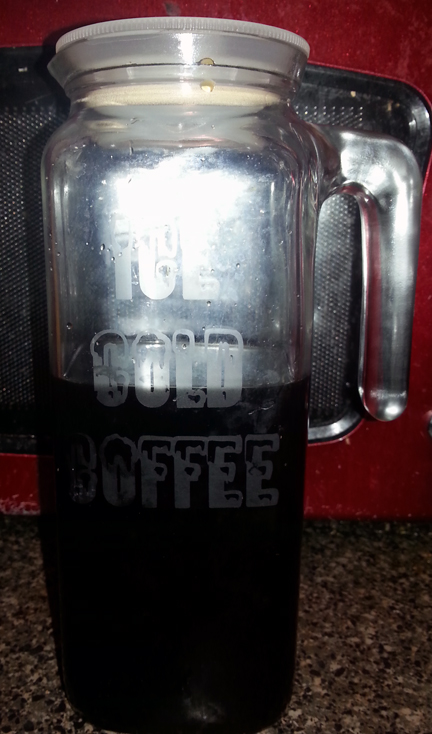
And then I pour it into the glass carafe
that I bought at the Container Store (because how can you not buy things at the Container Store?) and decorated with my Silhouette, etching vinyl, and etching cream in a fit of craftiness.
 |
| It says "Ice Cold Coffee" in a font that looks icy. Get it? GET IT? HAR HAR. |
STEP TWO: SIMPLE SYRUP
Lately I just do this in the microwave. Equal parts water and sugar in a glass measuring cup (1/2 cup of each is pretty good and it doesn't matter what sugar you use - I've used brown, white, and
cane sugar, and I've mixed the types when I'm running short on the one I really wanted), heat in the microwave for about 2 minutes, and stir WITHOUT BURNING YOURSELF OMG THIS IS HOT. If the sugar's not totally dissolved, microwave it again for 30 seconds or so, then stir again. Or do it on the stove top. It's not a huge deal.
When it's done, it will be hot so store it however you want. I let it cool in the measuring cup before pouring it into
a little glass bottle I bought once at the Container Store because of course I bought more than one thing at the Container Store. And also I don't want to crack that cute little glass bottle, do I? I do not. Sometimes I throw vanilla in there - some of a bean or some extract - but mostly I just leave it plain.
 |
| Isn't it cute? I used Zulka cane sugar in this go 'round. |
STEP THREE: ICE AND STUFF
This is the
big fancy recipe you have been WAITING FOR. (For which you have been waiting...? No, I said I wasn't going to do that!)
1. Take some ice cubes and put them in a glass - water ice cubes, plastic ice cubes, coffee ice cubes, whatever. Cold brew is super strong so coffee ice cubes aren't a big deal either way. I have a few glasses I use for my iced coffee, but in the end I usually go back to a mason jar topped with a
Cuppow. And for me, iced coffee
always needs a straw.
 |
| CUPPOW! BAM! BOOM! I wish you could see that this Mason jar has an etched image of Massachusetts on it (not made by me) but I simply could not get it to show up on camera. Imagine it. |
2. Pour some of the cold brew coffee on the ice cubes. I don't measure, I just pour. You can't mess this up.
3. Pour some milk on there. Lately I have been using cashew milk because I won a bunch of coupons to get it for free but whatever. Cow. Cashew. Almond. Soy. Hemp. Coconut. I don't care, it's all good.
4. Then add in a slog of simple syrup. I don't measure this either, but I guess 1-2 tablespoons in a glass? Nah, just taste it. You'll figure out what you like. I like mine sweet like a dessert.
Oh and if you want a mocha, well, that's all EXTRA FANCY RECIPE TIME. Pour some CHOCOLATE SYRUP* in it and stir. Then it's a mocha. Tadaaaaaaaaaaaa.
*I'm partial to Trader Joe's Midnight Moo.
Then drink it.
So let us break down this recipe:
Coffee, ice cubes, milk, something sweet, perhaps something chocolate.
I have, in the past, also thrown in some xanthan gum - a tiny pinch - and then poured the whole shebang into my Vitamix and made a frappe of sorts (the xanthan gum keeps it thick and stops it from separating - it's not necessary but nice), but that is just too much work lately.
There. Go drink your iced coffee.
Have I gone viral yet?
PS If you find a typo in this post, don't tell me. Famous bloggers make typos and grammatical errors all the time - I'm just following along. This time. This once. JUST THIS ONCE.
This post contains some referral links. If you click through and make a purchase, I get a few cents that I use to buy things like more coffee.
*I have already updated this post to fix two typos since I first published it.